Showing posts with label of. Show all posts
Showing posts with label of. Show all posts
Monday, February 10, 2014
Tools of the Trades
Some New-Old Tools
 Its Sunday afternoon and I spent the morning out in Pickering, Ontario at the Tools of the Trades Show. Its a really nice gathering of vintage and antique tool dealers peddling their wares to wood geeks like me! I would have posted some info on the event sooner but I only found out about it myself this past week. Oh well, for those that missed it you can catch the Spring session in April.
I went there this morning with nothing in mind really, I dont actually have a short list of tools I currently need or even want(imagine that). Once there though I found many, many tools I would have loved to acquire but my wife would have shot me if I came home with a truck load of new-old tools!
Anyhow, I did make two small purchases- the first is a small little oil can; I wanted one of these for awhile now and this one fit the bill perfectly. Ill use it to keep my Jojoba oil in. Jojoba oil is a natural, non-toxic oil product I use on my tools to keep rust at bay. Its similar to the camellia oil you may find for sale at places like Lie Nielsen Toolworks. The main difference is its a little heavier but easily found off-the-shelf at health food stores while camellia oil is a little more rare(at least it seems to be in Toronto). The little oil can is copper or brass I believe and will live nicely above my work bench.
 The second treasure I stumbled over is a beautiful example of a 1930s Stanley No.22 Transitional Smoother. If youre familiar with transitional planes you may have read reviews about the problems they seem to have with the rear totes moving and becoming loose while in use. One big plus about the No.22 is it doesnt have a rear tote, so......no problem! For anyone that isnt familiar with transitional planes they were wooden bodied planes that had a cast iron frame screwed into the body which was usually made from Beech. This perticular model has a kind of squat, mushroom shaped knob thats a little beafier than the taller, slimmer styles found on Stanleys metal planes. I like this robust little front knob and find it fits my hand quite nicely.
Stanley claimed that "Every Carpenter needs two or more wood planes in his kit, for rough outside work" and the transitional plane was the answer for it. For a wooden bodied smoother, I really like the feel of this model and the fact that it doesnt have the rear tote adds to the comfort while in use. This model was also the first with a lateral adjuster. If youd like some more information about transitional planes or any other Stanley hand planes for that matter, check out Patrick Leachs web site. Its an incredible resource of information.
 This one is in beautiful shape with the original chip breaker and iron, a near-perfect condition lever cap and very-very few marks on the sole. Having the original chip breaker and iron with the added bonus of the Sweetheart logo still clearly visible was a nice touch indeed but that said, Ill rip them out of it as soon as I can and replace them with new ones from Ron Hock! What can I say Im a worker, not a collector!
So these were my finds, small treasures on a nice Sunday morning surrounded by vintage tools and friendly people. If you were there you know what Im talking about, if you missed it then maybe you can make the next one in April.
Cheers!

Read More..
Its Sunday afternoon and I spent the morning out in Pickering, Ontario at the Tools of the Trades Show. Its a really nice gathering of vintage and antique tool dealers peddling their wares to wood geeks like me! I would have posted some info on the event sooner but I only found out about it myself this past week. Oh well, for those that missed it you can catch the Spring session in April.I went there this morning with nothing in mind really, I dont actually have a short list of tools I currently need or even want(imagine that). Once there though I found many, many tools I would have loved to acquire but my wife would have shot me if I came home with a truck load of new-old tools!
Anyhow, I did make two small purchases- the first is a small little oil can; I wanted one of these for awhile now and this one fit the bill perfectly. Ill use it to keep my Jojoba oil in. Jojoba oil is a natural, non-toxic oil product I use on my tools to keep rust at bay. Its similar to the camellia oil you may find for sale at places like Lie Nielsen Toolworks. The main difference is its a little heavier but easily found off-the-shelf at health food stores while camellia oil is a little more rare(at least it seems to be in Toronto). The little oil can is copper or brass I believe and will live nicely above my work bench.
The second treasure I stumbled over is a beautiful example of a 1930s Stanley No.22 Transitional Smoother. If youre familiar with transitional planes you may have read reviews about the problems they seem to have with the rear totes moving and becoming loose while in use. One big plus about the No.22 is it doesnt have a rear tote, so......no problem! For anyone that isnt familiar with transitional planes they were wooden bodied planes that had a cast iron frame screwed into the body which was usually made from Beech. This perticular model has a kind of squat, mushroom shaped knob thats a little beafier than the taller, slimmer styles found on Stanleys metal planes. I like this robust little front knob and find it fits my hand quite nicely. Stanley claimed that "Every Carpenter needs two or more wood planes in his kit, for rough outside work" and the transitional plane was the answer for it. For a wooden bodied smoother, I really like the feel of this model and the fact that it doesnt have the rear tote adds to the comfort while in use. This model was also the first with a lateral adjuster. If youd like some more information about transitional planes or any other Stanley hand planes for that matter, check out Patrick Leachs web site. Its an incredible resource of information.
This one is in beautiful shape with the original chip breaker and iron, a near-perfect condition lever cap and very-very few marks on the sole. Having the original chip breaker and iron with the added bonus of the Sweetheart logo still clearly visible was a nice touch indeed but that said, Ill rip them out of it as soon as I can and replace them with new ones from Ron Hock! What can I say Im a worker, not a collector!So these were my finds, small treasures on a nice Sunday morning surrounded by vintage tools and friendly people. If you were there you know what Im talking about, if you missed it then maybe you can make the next one in April.
Cheers!
First Installment of Humpday Giveaway!
Welcome to the first installment of Humpday giveaway ... something fun for the middle of the week! Im not sure how many there will be, but I will be posting in the middle of the week when I have something fun to share :)
Today I am giving away the stencil that we made for the trellis wall.

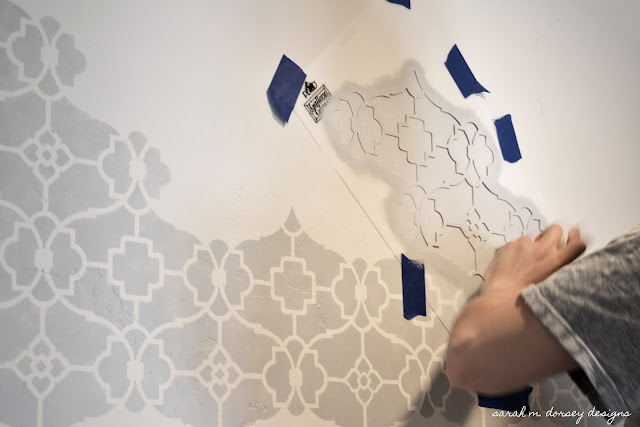

This stencil has been used, so there will be some paint on it ...
If interested enter on the widget below!
a Rafflecopter giveaway
Read More..
Today I am giving away the stencil that we made for the trellis wall.
This stencil has been used, so there will be some paint on it ...
If interested enter on the widget below!
a Rafflecopter giveaway
a burst of activity


here we have another upcoming project that took some time to design and figure out. it will be a credenza in a north carolina law office, along with the ant attack table above.

using claro slab cutoffs, well cut the short cut offs into veneers, and lay up the door and drawer face panels like a puzzle. it will have a welded and polished steel base by sam. i am looking forward to seeing this one get umderway. it should be a fun one.


march, 2009 .. +/- 26 x 72


ok, work on your pottery too
Friday, January 24, 2014
Tool of the Month 3
So first, this is late and is actually Decembers Tool of the Month (sorry), and second, this is really two tools, but theres a connection so Im breaking my own rule (not sorry).
Heres the deal, I was frantically trying to get Claras play kitchen finished in time for Christmas (thats another post...) and worked myself into a bit of a corner (so to speak). I was ready to install the bottom, which was going to be screwed down to cleats on the sides, but I needed to drill pilot holes to keep the cleat from splitting. On one side that was not a problem, but on the other the cleat for the bottom of the oven was just a few inches above the bottom cleat, and there was not much room to work. My hand drill was out, and even my cobblers awl couldnt fit in there. Hmm.
I was just resigning myself to removing the upper cleat, which I really didnt want to mess with as it was glued in the middle (but not the ends to allow the sides to move) and I was not looking forward to dealing with that. Then, inspiration struck and less than two minutes later the holes were bored - sweet!
Heres the setup for tool #1:

The awl is a finish nail sharpened on a file and I think you can see what the handle is. It worked well with one hand applying pressure up near the awl, and the other working the handle back and forth. I love it when a problem can be solved by improvising with whats on hand!
So after solving that problem, I faced the second problem of driving screws in the same location. This one was solved by drawing on my deep reserve of tools. As youve probably noticed, I love old tools and will frequently acquire tools that I dont technically "need" but know will come in handy someday. This was one of those days.
The tool is a Mayhew 18" auger bit extension. Im not sure, but I think this may be the same Mayhew Tools that is still around today. They started back in 1856 in Shelburne Falls, Massachusetts. If I had to guess the age, I say this was from the early 20th century - somewhere around the 1920s. But thats only a guess, and of course, I could be wrong.
What I really like about this extension is the very simple locking mechanism it uses. Basically, there is an inner cylinder with a tapered socket for the augers square-tapered tang. Thats the inner square you can see in the image below. The outer cylinder has a larger square opening rotated 45 degrees to the inner square. This outer square opening is larger than the tapered tang of the bit, but will lock down across the shoulders of the tang due to its rotation. In use, the outer cylinder is raised by means of a threaded collar, the bit tang inserted through the outer square, rotated, then dropped into the inner socket. All that remains is to screw the outer cylinder down until the bit is locked in tight. Very simple, and much easier to do than explain.
Heres the extension with both squares visible - the Lee Valley brace hex driver adapter I use is on the bench in the background:

Heres a shot of the adapter locked in the extension with a square drive bit fitted in the adapter:

And finally, the point of using this extension - it allowed me to use a much shallower angle of approach on the screw by moving the brace further away from the cramped location:

Heres a closer shot which should make it pretty clear:

This was a pretty cool evening in the shop - hitting two of the things I love about woodworking, improvising tools and techniques and getting to use a special old tool, all in the space of about five minutes! A good evening indeed.
Thursday, January 23, 2014
More Photos of Yacht Tender

These are just a few photos, of the finished boat
and what it looks like today.


It was an ambitious project, but I learned a lot about woodworking during the process.

Subscribe to:
Posts (Atom)